The kit arrived just in time for the weekend! I put the bottles, caps, and sticker labels away since I do not need them today. In addition to the supplies that came with the kit, I laid out a can opener, measuring cup, spatula, whisk, and a large pot to boil the water. Now its time to brew the West Coast Pale Ale! The online version of the Mr. Beer directions that came with the kit can be found here. Before starting, I read the directions to make sure I had everything I needed. I actually read them twice (and still managed to mess up early on).
Step 1: Assemble the fermenter. This is as easy as attaching the spigot. Be careful not to over tighten the spigot in this step. I read some reviews cautioning about this because it can crack the fermenter, but you obviously want it tight enough so it will not leak!
Step 2: Sanitize. I have been reading a lot more of the forums this past week and everyone stresses how important it is to sanitize your equipment. The directions say to Sanitize all equipment that comes in contact with your beer.
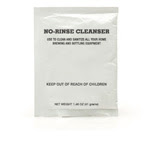
The kit comes with a simple no-rinse cleanser.
I was wary the "no-rinse" aspect would affect the beer, but figured it couldn't have negative implications since it was included with the kit. The directions tell you to fill the fermenter to the 4-quart mark on the back of the keg and add 1/2 the pack of no-rinse cleanser, I dumped in the whole pack... You need the other half to sanitize the bottles, caps, etc. when it comes time to bottle the beer. I will just have to pick up another sanitizer before then. I added an extra 4-quarts into the fermenter to make the sanitizer to water ratio correct. I placed the utensils into my boiling pot and added half of the sanitized solution since I had "extra" and let it sit for 10 minutes.
Step 3: Brewing. I broke the brewing process into a few substeps.
3.1 After you have emptied out all of the sanitizer, the next step is to fill the fermenter to the 4-quart line again with water. I just used tap water since mine tastes great. The directions suggest using bottled spring water or charcoal filtered water if your tap water is undrinkable or has a bad taste/smell. The yeast is shipped under a plastic lid on the can of Hopped Malt Extract (HME). Remove the lid and yeast, and place the can of HME into a bowl of lukewarm water. This will loosen the syrup making it easier to poor and get out of the can.
3.2 Mixing in the booster can be a little annoying. Constantly stirring the water is key, while slowly pouring the booster powder. The powder crystallizes immediately. I started using a whisk to dissolve the booster, but switched to a rubber spatula for two reasons. I didn't want to scratch the bottom of my pot and it was easier to mash the booster crystals against the side, allowing them to dissolve easier.
3.3 Once the booster is fully dissolved, bring the pot to a boil, then remove it from heat. Open the can of HME and pour it into the water. It’s really sticky, but try and get as much out as possible using the spatula. Once the HME is added, the mixture is now called the wort.
3.4 Pour the wort into the fermenter. Bring the volume of the keg to the 8.5-quart mark by adding more cold water. I used the whisk to stir vigorously (as described in the directions) and mix the wort. Sprinkle the yeast into the fermenter, and let it sit for five minutes. Then, stir vigorously and screw on lid (this is called pitching the yeast and begins the fermentation process).
That's it! I placed a piece of cardboard underneath the fermenter just in case it leaks. The directions say to place the fermenter out of direct sunlight, in a location with a consistent temperature between 68°-76° F. The heat my apartment goes off during the day, so I hope the temperature drop doesn't negatively affect the outcome of the beer.


No comments:
Post a Comment